Klarbefund user guide
Klarbefund turns a paper lab report into values you can read, check against the paper, and follow over time. Everything runs on the phone: the scan, the reading, the coding, the store and the exports. Nothing needs an account, and nothing leaves the device unless you send it.
This guide walks through the app as a person uses it, task by task. The developer side (building, testing, the shared dictionary, the store layout) is the developer guide. The work is tracked in issue #186.
Every screenshot in this guide shows invented data. The laboratory, the practice, the patient and every number come from the app's own fictional development dataset, so a screenshot can be published without a real report ever being involved. How they are made is at the end of this guide.
| App name | Klarbefund, in English and German |
|---|---|
| Runs on | iPhone, iOS 26 or later |
| Get it | Public TestFlight beta, 200 places |
| Languages | English and German, following the phone's language |
| Source | clients/ios/ |
| Privacy | Privacy policy |
| Not | a medical device: it explains what a measurement is and never judges a value (below) |
1. Getting started
- On the iPhone, open the TestFlight link. TestFlight installs itself first if it is missing, then offers Klarbefund.
- Open Klarbefund. There is no sign-up and no account: the app is ready for the first scan.
- The first time you scan, iOS asks for the camera. The app uses it only for the pages of a report and for the QR code that connects it to your record; the photographs stay on the phone.
The lock. By default the app asks for Face ID, Touch ID or the passcode every time it comes to the front, so your results are not on show to whoever holds the unlocked phone. The switch is under Analysis provider in the ⋯ menu, section Protection. A phone without a passcode has nothing to ask for, and the lock then opens by itself.
2. Your reports
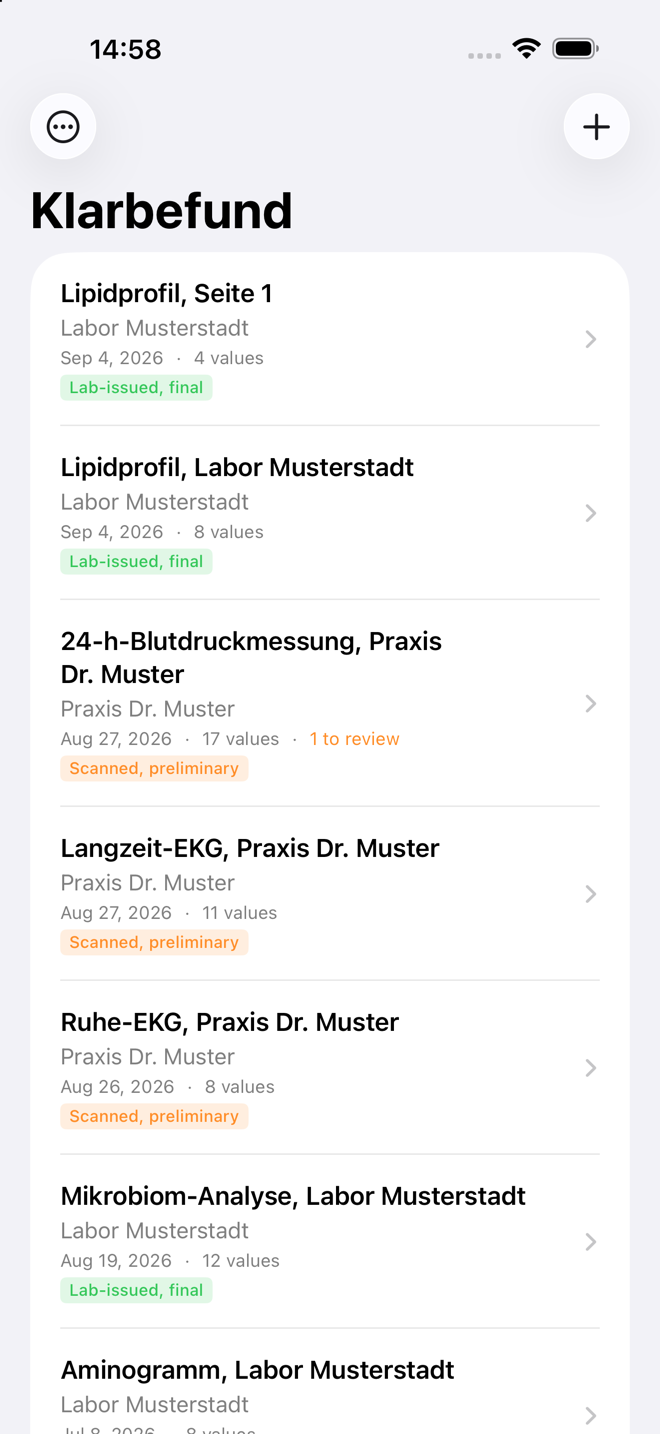
The home screen lists every report, newest first: the title, the laboratory, practice or device it came from, the date it was taken and how many values were read. 1 to review marks a report with a value you have not yet checked against the paper.
The coloured badge is the report's provenance, and it matters more than it looks. Lab-issued, final means the values came out of a PDF that carried the laboratory's own text, so nothing was guessed. Scanned, preliminary means the values were read from a photograph, of a paper sheet or of a device's screen, and a photograph can be misread. A value stays preliminary until you have checked it against the original.
The top of the list has what belongs to looking at your reports: Trends, My EHDS record with the state of your connection, and Possible duplicates when two reports look like the same one. The + button starts a scan, an import, or Earlier measurements entered by hand. The ⋯ button holds settings and your rights over your data, in three groups: About you (profile, reference values), Privacy and sharing (consents, analysis provider, privacy and safety) and Your data (export, delete, and under Research and support the OMOP export and the diagnostics).
3. Getting a report in
There are three ways, and the document decides what its values are worth.
- Scan report opens the camera for a paper report. The app finds the page edges, reads the table on the device, and keeps the pages as a PDF next to the values. Multi-page reports are fine.
- Import a PDF or photo takes a file your laboratory or portal gave you. If the PDF carries the laboratory's own text layer, the values are marked final; a PDF that is only a picture goes through the recogniser like a scan.
- Import from Photos takes photographs already on the phone, up to twelve at a time.
The app reads more than laboratory sheets. A 24-hour blood pressure measurement, a resting or exercise ECG, a Holter report, a spirometry, a lactate test, a CGM glucose profile, a DXA scan and a gut microbiome analysis each have their own reader, so the values a practice prints on those sheets arrive with the right codes and units.
A body-composition scale photographed in a gym is recognised as what it is: a dashboard, not a report. The app reads the metric, its current value and the date the scale shows, and where the scale plots a history it measures the points on the chart and marks those values as estimates. The scale's own verdicts ("Normal", "Low") are ignored; they are the manufacturer's bands, not a guideline's.
Before anything is saved, the app shows what it read and asks you to confirm the laboratory date it found on the sheet. A report that looks like one you already have is pointed out; Possible duplicates, at the top of the list, appears whenever two stored reports look like the same one.
4. Checking a report, value by value
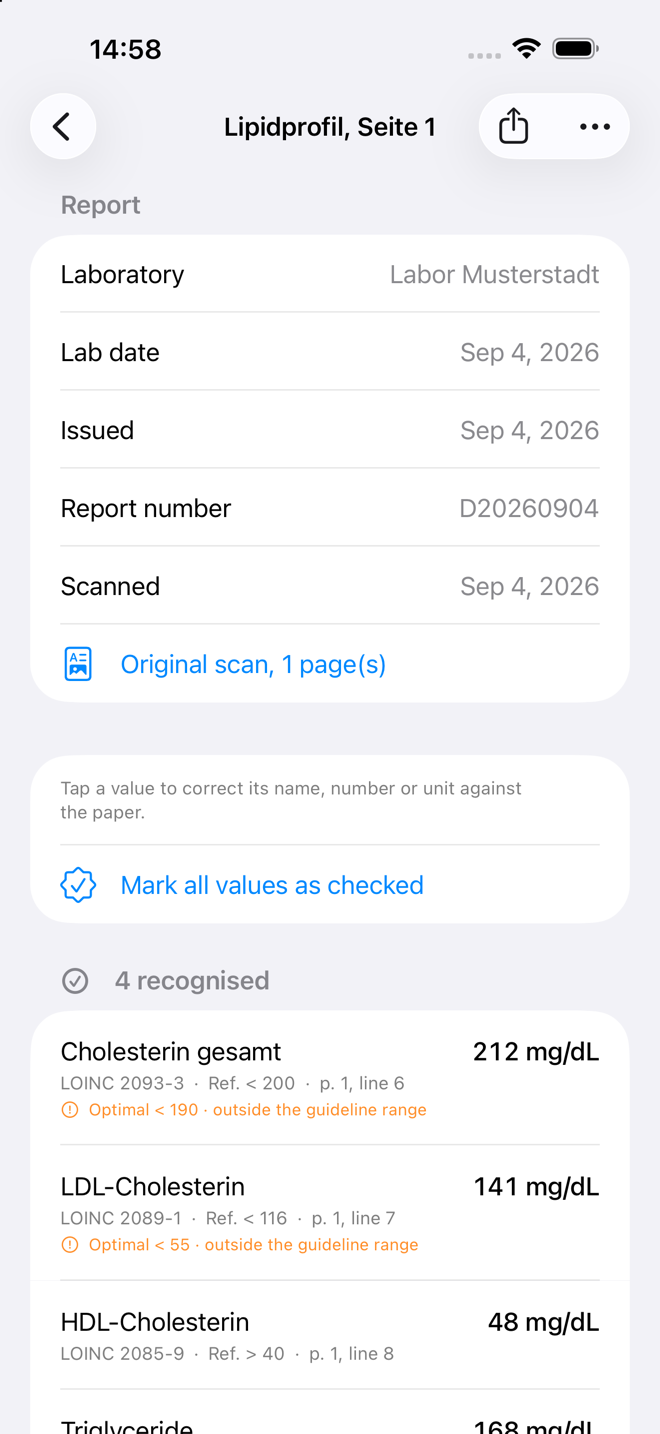
The top of a report is what the app read from the sheet's header: the laboratory, the date the sample was taken, the date the report was issued, the report number, and a link to the original pages.
Then every measurement, and under each one the four things that make it checkable:
- the LOINC code it was matched to, so the value means the same thing in every system it is exported to. The unit picks the code, never the name: lipoprotein(a) in mg/dL and in nmol/L are different measurements with different codes. A quantity LOINC does not code says so plainly instead of showing a near-enough code, and an organism from a stool report shows its NCBI Taxonomy id instead, because LOINC names tests and not organisms;
- the reference range your laboratory printed, exactly as printed, never normalised;
- the page and line it was read from, so any number can be checked against the paper in front of you;
- the published band, where a guideline or a named study states one, with the words and a symbol beside the colour: "in the optimal band", "outside the optimal band", "outside the guideline range". This is a comparison to a number somebody published. It is not a finding.
Checking against the paper. Tap a value to correct its name, number or unit; the correction is kept beside what the recogniser read, so the paper trail stays. Mark all values as checked turns the report's values from preliminary into checked once you have compared them. A report with values still to check carries to review in the list.
Below the recognised values come two lists the app never hides: the lines that looked like measurements but matched nothing in the dictionary, and the lines that could not be read at all. A row that vanished silently would be indistinguishable from a row that was never printed, so no row vanishes. Report missing values in the report's menu sends the developers the labels of such rows, never the values, so the dictionary can grow.
The share button offers the exports described further down. The menu lets you read the report again with the current version of the reader, scan the paper again, edit its name and laboratory, export its diagnostics, or delete it.
5. The original pages
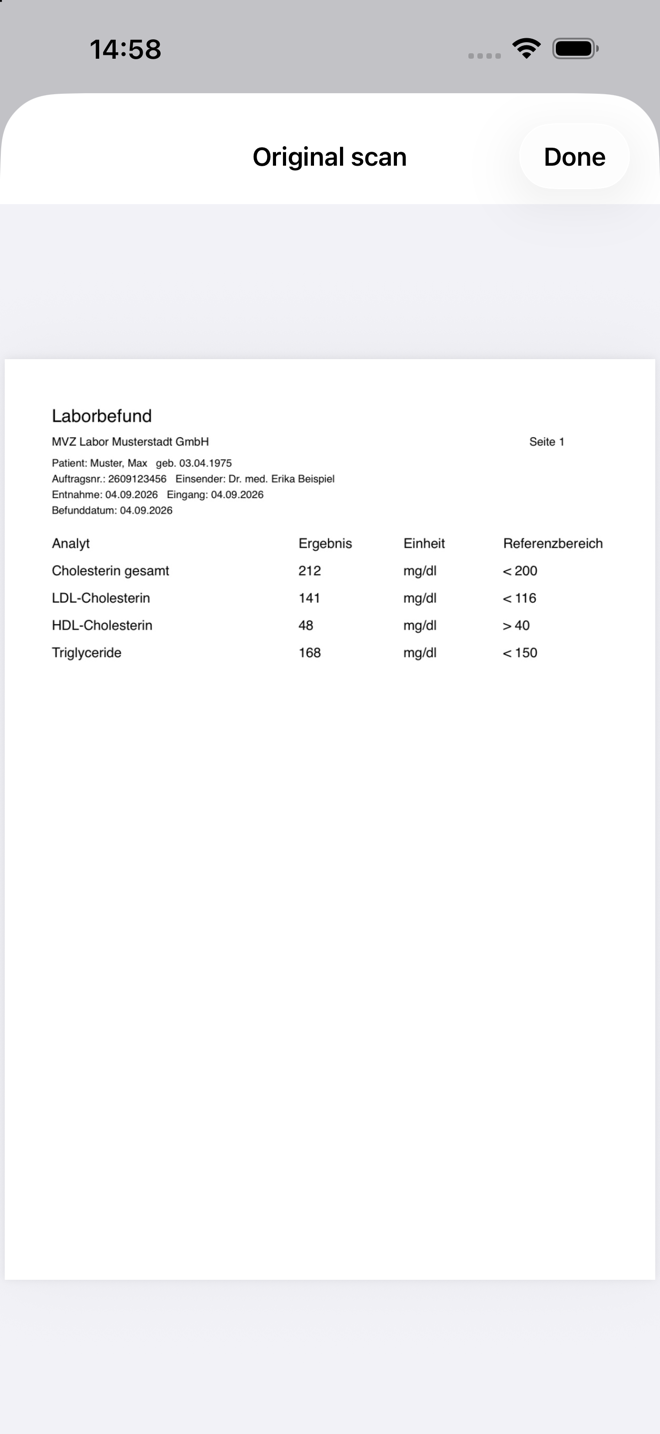
Every report keeps its pages, as one PDF, encrypted like the values. Original scan shows them back, so the source is always one tap away from the reading.
6. Trends
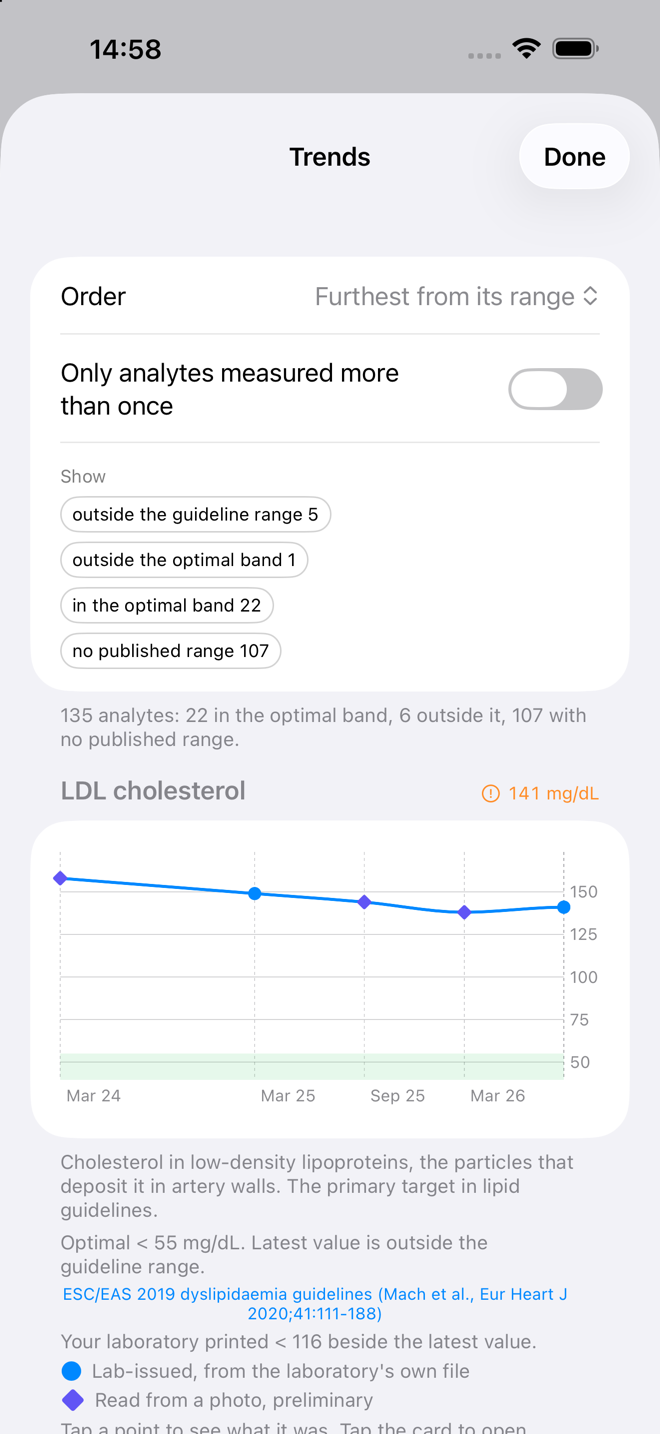
Trends draws one chart per measurement across every report, ordered by what is furthest from its range. The filters narrow it to what matters: only analytes measured more than once, or only those outside a band.
Each chart says what it is showing. Every kind of evidence has its own shape: a circle came from a laboratory's own file, a diamond was read from a photograph and is preliminary, and a triangle was entered by you or taken from a device. A legend under every chart that mixes them names each shape in words, so nothing depends on colour or on tapping a point. The green band is the published optimal band where one exists; for everything else the band drawn is the range your own laboratory printed, in its own colour and named as such. Under the chart every point is listed with its date, where it came from and which report it belongs to, and tapping a point opens that report.
A sentence under each chart says what the measurement is: a definition of the test, in English or German. It is never a reading of your own value.
At the bottom, Show trends from Apple Health reads your resting heart rate, heart rate variability, steps and weight, after asking once for permission. They appear in their own section, From your devices, as grey dashed lines of weekly means on the same months as your reports, with a thin blue line on each report's day so the two can be read against each other. They are never drawn as a lab value: no range, no comparison, no colour that means anything, and they go into no export. The app reads them while the screen is open, writes nothing to Health and keeps no copy.
7. Reference values
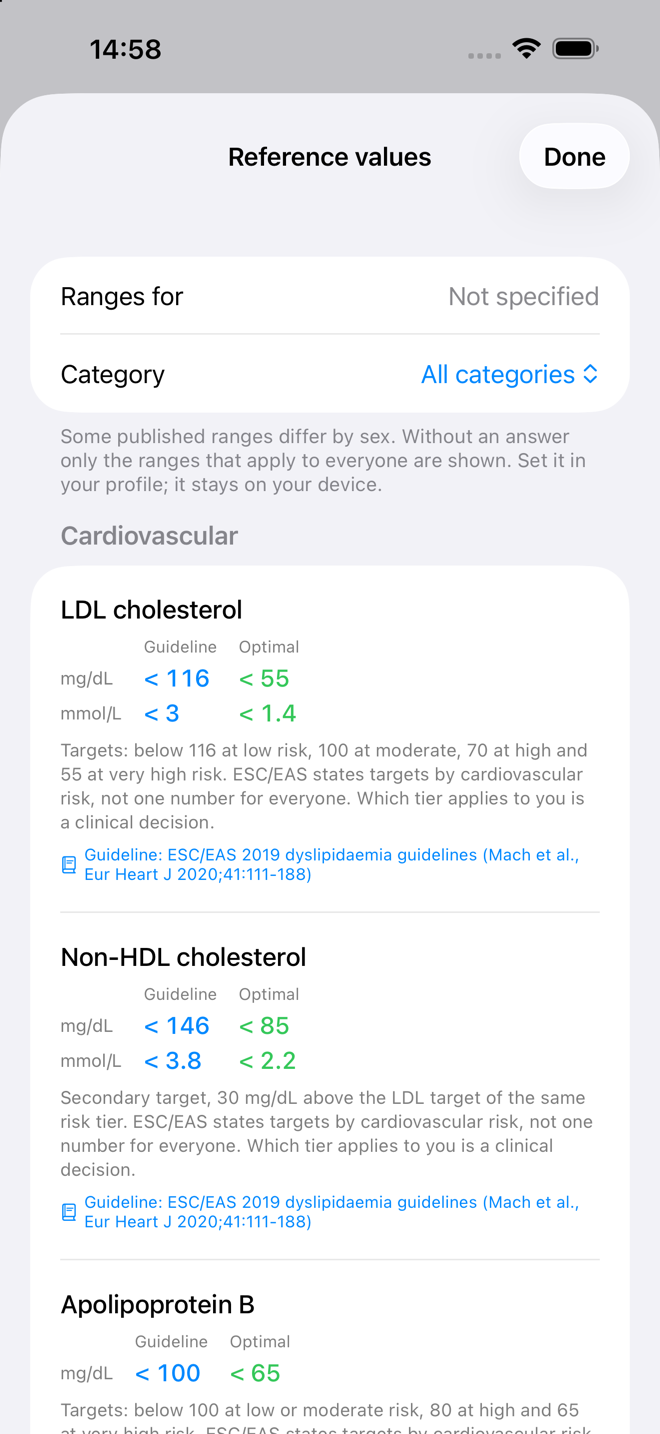
Reference values is the table behind the bands. One card per measurement, a line per unit, two columns: Guideline, the threshold a guideline body states for adults, and Optimal, the lowest-risk band the same source names. Every card names its source and links to it; where a source partitions by risk tier or by age, the card says so and leaves the choice of tier to a clinician.
A measurement with no citable source is simply absent. That is the difference from the longevity tables this screen was modelled on, which quote numbers nobody can check. The category menu narrows the list to one panel, and setting your sex in the profile adds the ranges that differ by sex.
8. Profile and earlier measurements
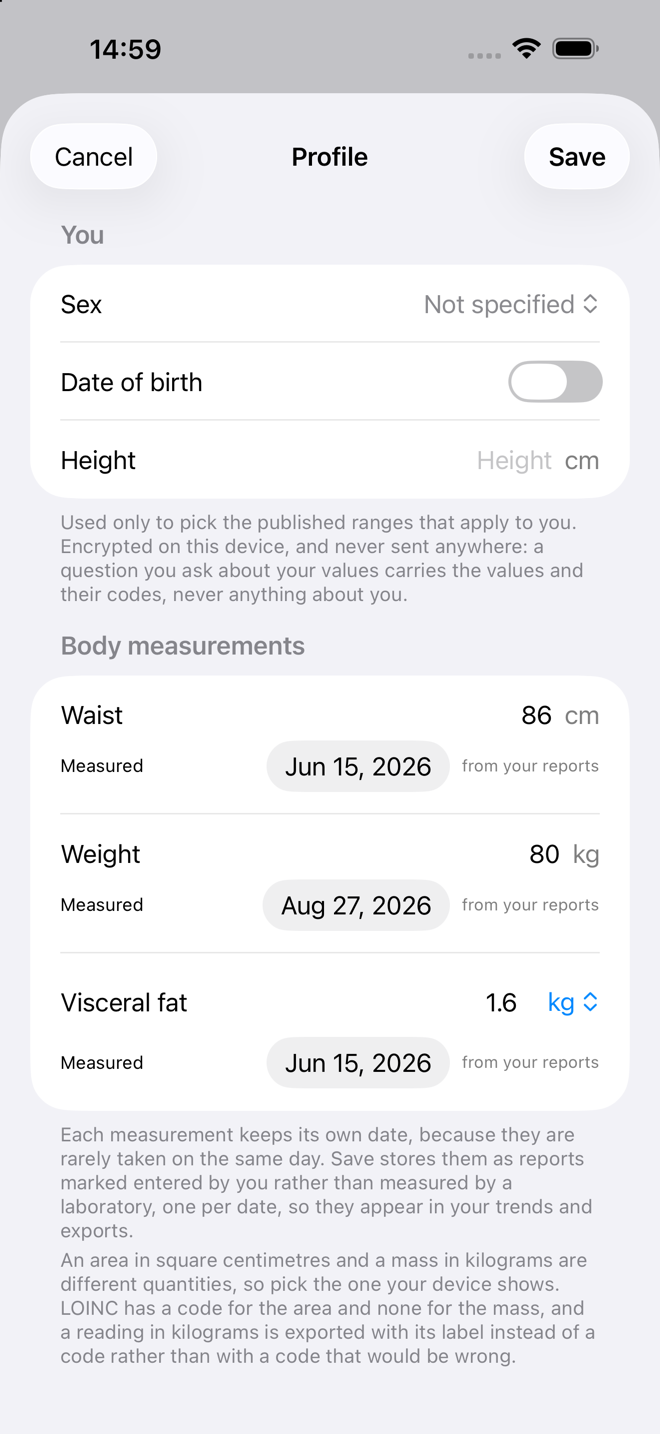
The profile holds sex, date of birth and height, used only to pick the published ranges that apply to you, and the body measurements: waist, weight and visceral fat. Each measurement keeps its own date and says where it came from. A value read from a scale's photograph is labelled as such; one you type is labelled as entered by you.
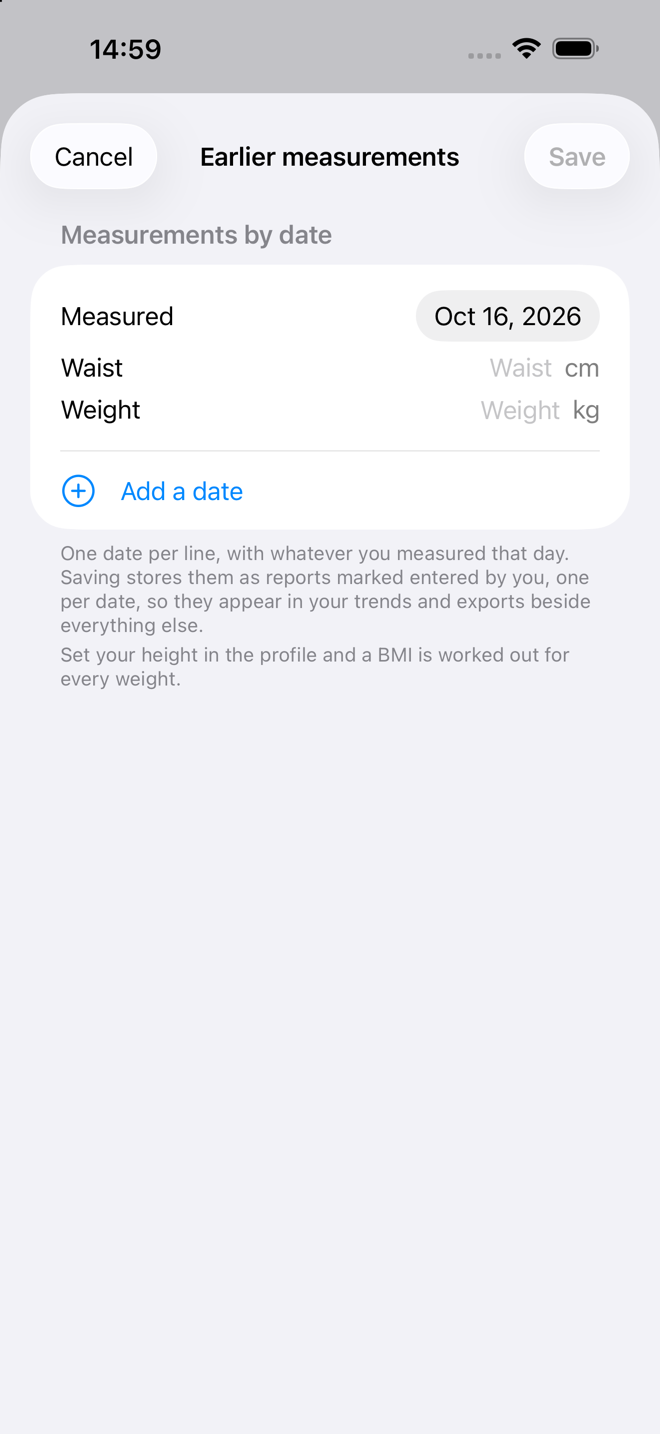
Earlier measurements, in the + menu, is for catching up: one date per line, with whatever you measured that day. Saving stores each date as its own report, marked as entered by you, and works out the BMI and waist-to-height ratio from the height in the profile. They join the trends and the exports through the same path as a laboratory's values.
9. Asking what a value is
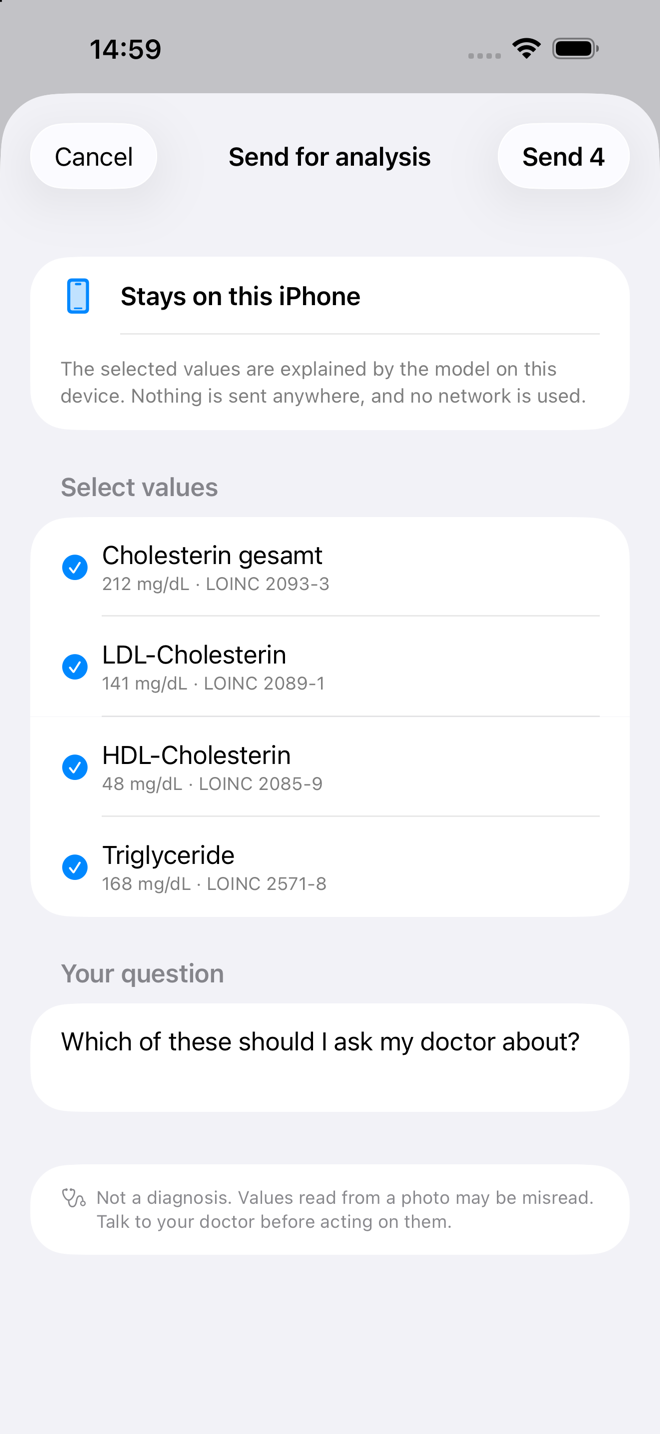
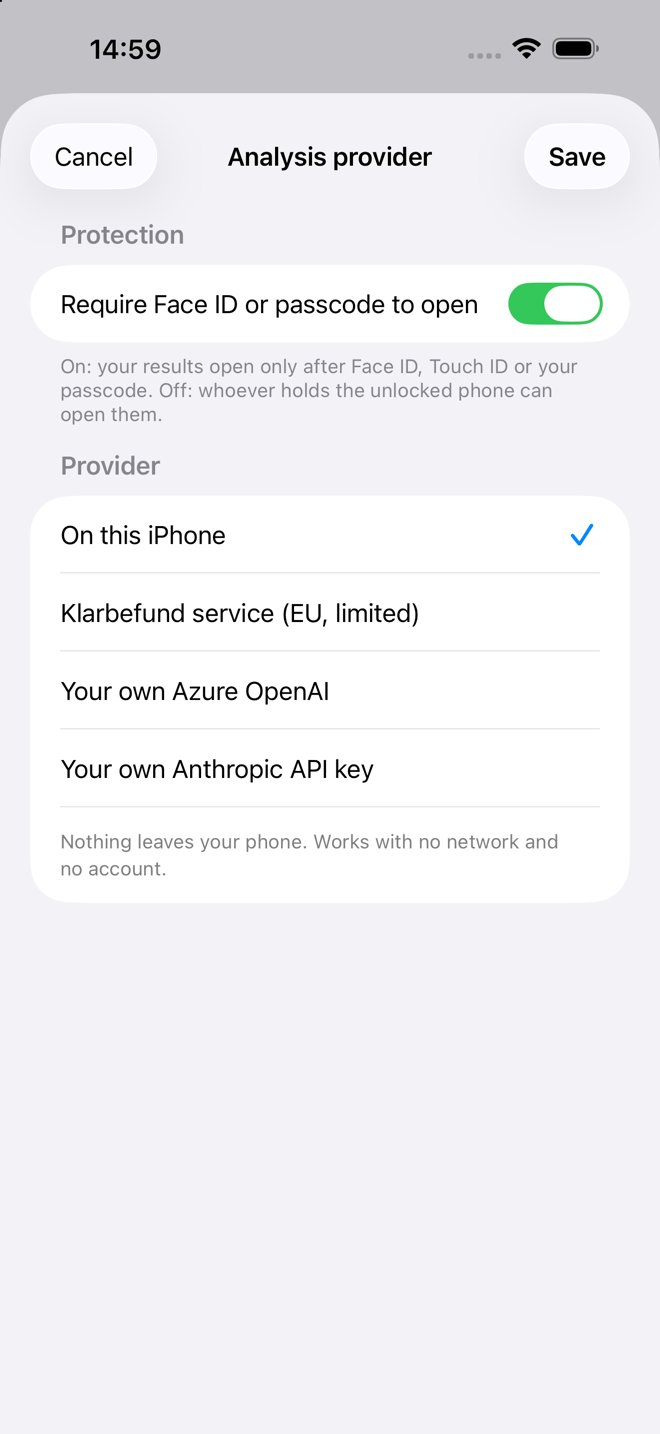
You can ask the app to explain a set of values. By default the model on the iPhone answers, so the question never reaches a network at all.
If you would rather use a service, you pick the values, see them listed with their codes, and confirm before anything is sent. Only those values and your question travel. Your name, date of birth and insurance number are never sent, because the app does not hold them; they may be printed on the scanned page, which stays on the phone. Whichever provider is in use is named on the screen before you send.
Analysis provider in the menu chooses where an answer comes from: on this iPhone, the Klarbefund service in the EU, or your own Azure OpenAI resource or Anthropic key. With your own service the phone talks to it directly, and neither the key nor the values reach the provider of this app. The same screen holds the Protection switch for the Face ID lock.
10. Consents
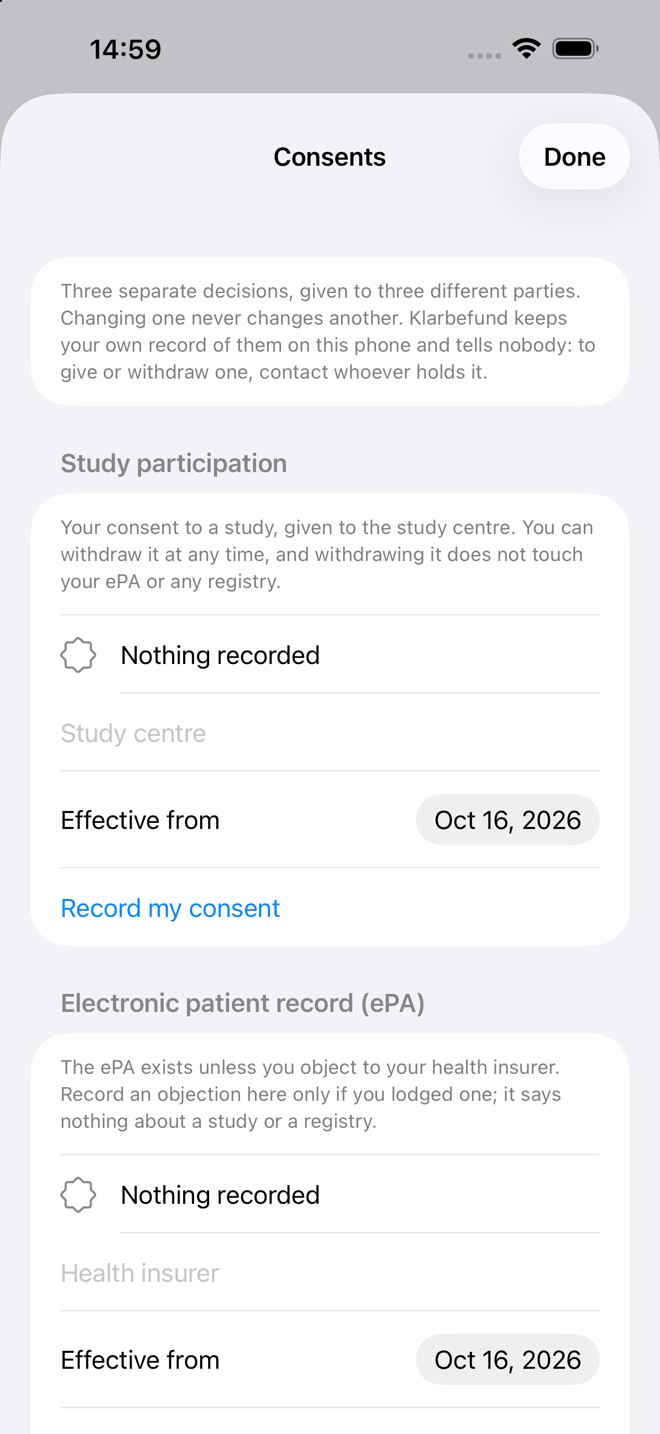
Consents, in the menu, keeps your own record of three decisions that are easy to confuse and must never be one switch:
- Study participation, your consent to a study, held by the study centre;
- Electronic patient record (ePA), an objection, because the ePA exists unless you object to your health insurer;
- Registry and research use, your consent for a registry or research database to use your values.
Each has its own state, date, holder and button, and changing one never changes another. Withdrawing keeps the earlier grant in the history, so you can still show when you gave it. The app tells nobody: to give or withdraw one, contact whoever holds it. Two places use the record. Export for research asks once before exporting when no registry consent is recorded, and Share for my doctor reminds you, when you recorded an objection to the ePA, that there is no ePA to upload to while it stands.
11. Connect to EHDS
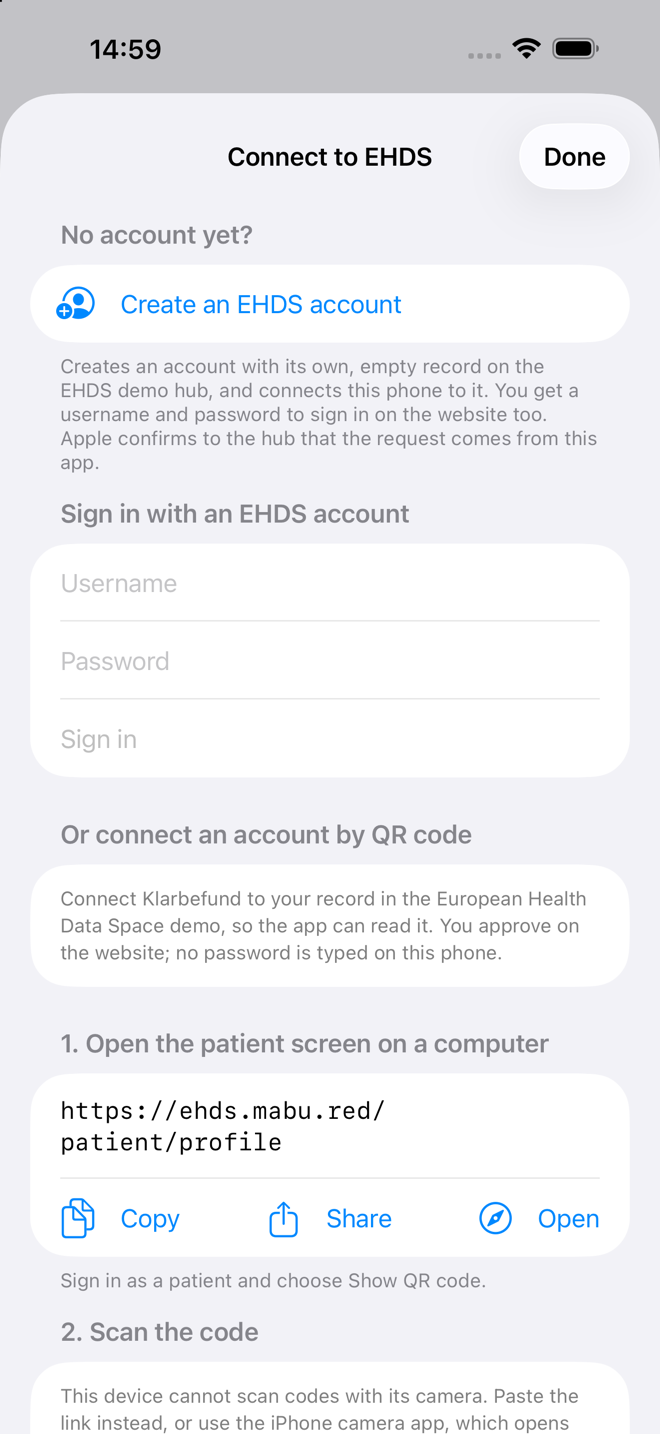
My EHDS record, at the top of the list, says whether the app is connected and sending, and opens Connect to EHDS, which connects the app to your record in the European Health Data Space demo hub, so it can read it and, if you decide so, add to it. There are three ways in, and no password is typed into a web page on the phone:
- Create an EHDS account makes an account with its own, empty record on the demo hub and connects the phone to it. You get a username and password to sign in on the website too. Apple confirms to the hub that the request comes from the genuine app on a real device, which is why a simulator cannot do this.
- Sign in with an EHDS account you already have.
- Connect by QR code, from the patient screen on a computer:
- On the computer, open the patient screen (the app shows the address, to copy, share or open) and sign in as a patient. Choose Show QR code.
- In the app, Scan QR code. On the computer, Approve on this computer opens Keycloak's consent page; check that the code shown there is the one the app shows, and approve.
- The app says which account it connected to and asks Is this your account? A code someone else showed you would connect the phone to their account, so if the name is not yours, choose Not me, disconnect.
Once connected, Show my EHDS record lists what the hub holds for you: measurements with their printed ranges and dates, reports, vaccinations and the medication plan. On the demo hub every record is synthetic, and the screen says so. The record is read when you open it, kept nowhere, and never mixed into your scanned reports.
Two switches decide what goes the other way, and both are off until you turn them on:
- Send my reports to my EHDS record: while it is on, every report you scan or read again goes to your own record, as preliminary values marked as read from a scan. Values without a LOINC code stay on the phone.
- Send my device trends to my EHDS record: the weekly means from Apple Health that the Trends screen shows, never a single day or a single reading; each sync replaces the last.
Switching either off stops further sending; what was sent stays in the record until you delete the account. Disconnect is in the app and on the patient screen, where every connected phone is listed. On a phone holding the patient screen itself, Open in Klarbefund does the same as the QR code, and the iPhone's camera app opens Klarbefund from the code too. The code works once, for two minutes.
11.1 Your EUDI wallet, if you want one
An EUDI wallet is optional. Klarbefund and the hub work with a username and password alone. A wallet adds a second way to sign in on the website: d-you, the German EUDI Wallet, or any other certified one, proves who you are with your PID (your digital identity card) instead of a password.
The hub never keeps your name or birth date. It keeps one secure hash of them on the account, which only says "this PID belongs to this account" (ADR-067). One PID belongs to one account, so decide where you start.
You have Klarbefund first, and add the wallet later
- In the app, Connect to EHDS › Create an EHDS account gives you a
username
kb-…and a password. Show password or Copy password shows it again. - On a computer, open the website and choose Sign in with Keycloak, with that username and password. Not Sign in with d-you: the wallet can only open an account it is already connected to, and this one is not yet.
- Open Health Profile › Connect your EUDI wallet, choose Connect your EUDI wallet, and scan the QR code with d-you.
- d-you names the service and asks for three things: given names, family name and date of birth. Approve them with your Digital ID code.
- The page says d-you is connected. From now on Sign in with d-you opens this account, and the app stays connected as before.
You have the wallet first, and add Klarbefund later
- On the website, choose Sign in with d-you (QR) and scan the code. Approve the same three things.
- No account belongs to your PID yet, so the page offers Create an account with this PID. Only choose it if you have no Klarbefund account: if you have one, connect the wallet to it as above instead, because your PID cannot belong to two accounts.
- The page shows a username
kb-…and a password, once. Save both, then I have saved them, sign me in. - In the app, Connect to EHDS › Sign in with an EHDS account with that username and password. The app and the wallet now open the same record.
Disconnect wallet, on the same page, removes the hash; the account, its record and the app's connection stay. Deleting the account removes the hash with it.
12. Exports and your data rights
Everything the app holds can leave it, in the form the recipient needs, and only when you say so.
| Action | For | What you get |
|---|---|---|
| Share for my doctor | a practice, the ePA | a PDF summary with the original pages appended, plus a FHIR R4 bundle |
| Export for research (OMOP) | an analytics team | OMOP CDM v5.4 measurement.csv, person.csv, observation_period.csv |
| Export all my data | you, under GDPR | every report, page, value, profile field and consent, in one archive |
| Delete all my data | you | the store is wiped for good; the account the app made on the hub, with its record, values and consents, goes too; the app says so before it does it |
| Export diagnostics | the developers | the recognised text and both recogniser passes, to fix a misread line |
The FHIR bundle carries every value with its LOINC code, its UCUM unit, the
range the laboratory printed (as numbers where they can be read, and always as
the printed text in referenceRange.text), and the page and line it was read
from. A value read from a photograph is marked preliminary in the bundle too.
The doctor export fits the ePA's 25 MB limit with the pages attached.
Everything goes through the system share sheet: to the ePA app, Files, AirDrop, or mail. There is deliberately no upload of its own, because there is no API into the ePA for an app like this, and the citizen is the integration point.
13. Privacy and safety
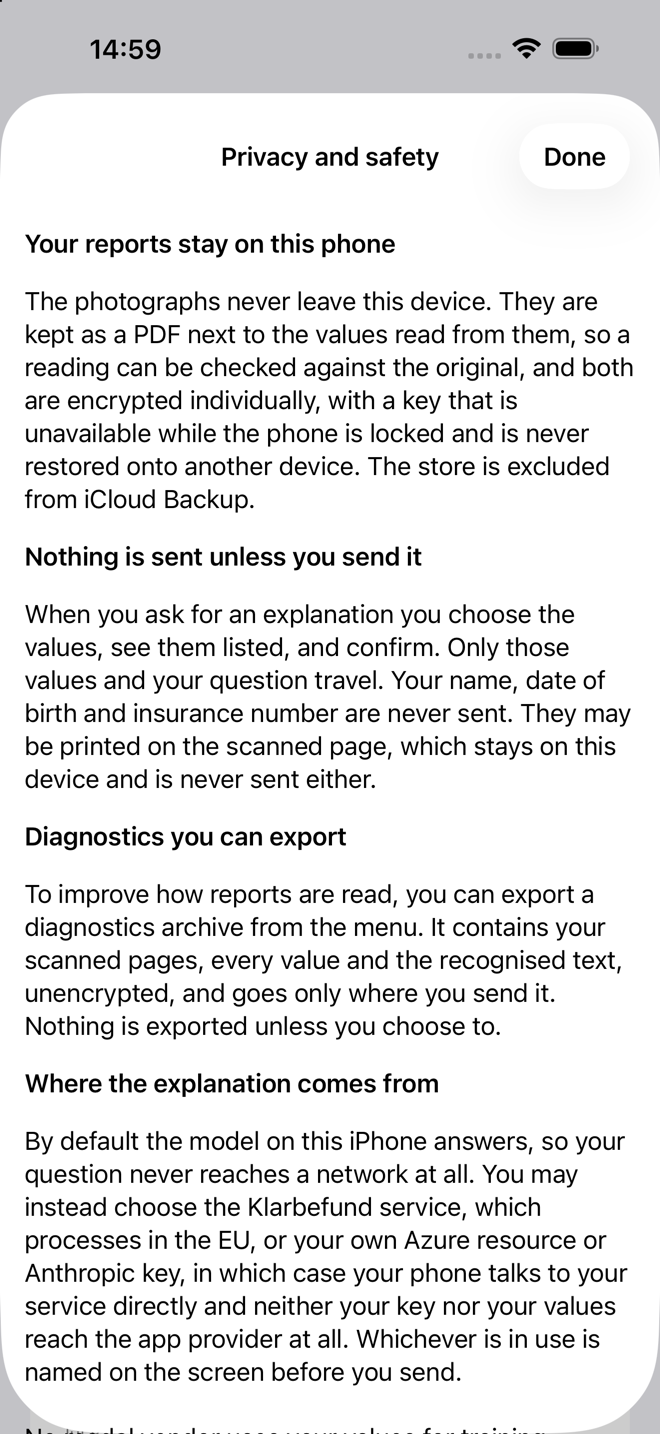
The photographs never leave the device. Values, pages and diagnostics are encrypted individually with a key that is unavailable while the phone is locked and is never restored onto another device. The store is excluded from iCloud Backup. When the app is not in front, its content is covered, so the app switcher shows nothing, and coming back asks for Face ID or the passcode.
This was checked, not assumed: with the phone on a cable, copying a stored record, an export left in the temporary folder, or the system's own snapshot of the app all fail with a permission error, which is what complete file protection looks like from outside. The full assessment, objective by objective, is the self-assessment; what was tested and how is in evidence.
14. Not a medical device
Klarbefund explains what a measurement is. It does not diagnose, does not assess your risk and does not recommend treatment. No screen says normal or abnormal, scores anything, or advises. A value read from a photograph can be misread and is marked preliminary until you check it against the paper. Reference ranges are shown exactly as your laboratory printed them, and the published bands beside them are quotations with a source, not a verdict.
Always consult a doctor before making any decision about your health.
15. When something is read wrong
A recogniser reads a photograph, and photographs get misread. Three things help, in this order:
- Compare with the paper. The page and line under every value is there for this. Tap the value to correct it; the correction is kept beside the reading.
- Read again with this version, in the report's menu, after an app update: the pages are kept, so a better reader can read them again. A re-read that finds fewer values than are stored is discarded, never saved over the better reading.
- Report missing values, in the report's menu, sends the labels of the rows the app could not code, never your numbers, so the dictionary can learn the laboratory's spelling. Export diagnostics hands you an archive with the recognised text to attach to an issue; it leaves the phone only through the share sheet, when you send it.
16. How these screenshots are made
The images in this guide are shot from a simulator by
clients/ios/Scripts/capture-screenshots.sh,
launching the app straight into each screen with the fictional development
dataset:
cd clients/ios
SEED=-MBDevData OUT=/tmp/shots \
  SCREENS="list detail scan trends reference history profile consent settings privacy consents connect" \
  Scripts/capture-screenshots.sh
for f in /tmp/shots/*.png; do sips --resampleWidth 660 "$f" --out "../../docs/klarbefund/img/$(basename "$f")"; done
The dataset is built in code, in memory, and is compiled out of a release build. Every laboratory and practice in it is invented and every value made up, which is the only reason a screenshot may be committed at all: the rule in the developer guide is that no real health data enters the repository, not even as a picture, not even temporarily.